Hello everyone! To match her 10 Top Nutrition Tips, Tiffany Rusch Dietitian is providing weekly recipients to inspire you to take those tips and put them into action!
Week #10: One more plant based meal!
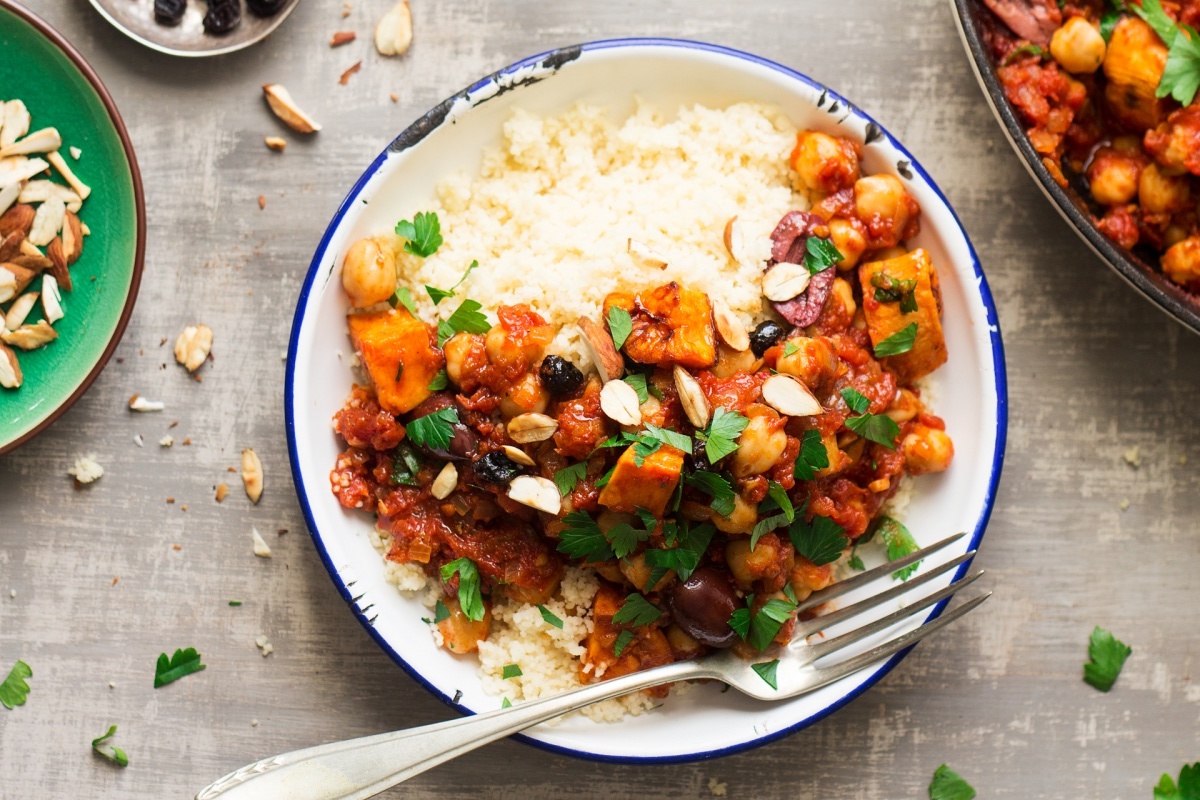
In following the themes of the original “Top Nutrition Tips” series, this week should have been “Make water your drink of choice more often”. Unfortunately that doesn’t make for a very fun recipe, so here is a hearty, healthy, plant based meal idea to spice up your January menu. This dish provides a healthy dose of plant based protein, fibre, and vegetables while being low in sodium and saturated fat which seems like a good way to round off this series. This is a quick and easy option for a mid-week meal, and I love to double this recipe so I can pack it for lunches throughout the week.
 Moroccan Chickpea Stew
(Serves 4)
Ingredients
1 Tbsp olive oil
1 cup diced onion (about 1 medium)
1 cup diced carrot (about 1 large)
2 garlic cloves, minced
1 jalapeño pepper, minced (or substitute 1 ½ tsp chili flakes + ½ green bell pepper)
1 1/2 cups cubed sweet potato (about 1 medium)
2 tsps ground cumin
1 tsp chili powder
1/2 tsp ground turmeric
Pinch of salt, to taste
1 can diced tomatoes, with liquid
1 (15oz) can chickpeas (garbanzo beans), rinsed and drained (or substitute soaked/cooked dry beans)
2 cups vegetable broth (See week 4 recipe for homemade broth inspiration!)
Chopped cilantro for garnish (optional)
Instructions
Heat olive oil in a large saucepan over medium-high heat. Add onion, carrot, garlic, and jalapeño to pan; sauté 6 minutes or until tender. Stir in sweet potato and next 7 ingredients. Bring to a boil. Cover, reduce heat, and simmer 30 minutes or until sweet potato is tender. Garnish with cilantro if desired.
This dish is great on its own, or it can be served over hot cooked rice or quinoa if preferred.

Week #9: Choose plant based proteins more often!
In the whole grain week, I snuck in the swap from beef to beans so if you want more plant based ideas after this recipe, feel free to check that one out as well! This week, I wanted to introduce you to tempeh. Everyone has heard of tofu whether you love it or hate it (Although many who “hate” it just haven’t tried the right recipe-I have some recipes that might change your mind!) Tempeh is tofu’s lesser known cousin. It is also a soy product, but soybeans are cooked, fermented, and pressed into bricks which gives it a drier texture and more earthy flavour. While heat and a short fermentation time may not mean substantial probiotic benefit, tempeh does contain prebiotics which aid digestion. Still not sold on soy? This recipe also works well with lentils instead!
Pasta with Tempeh Bolognese Sauce (serves 4)
Ingredients
1 Tbsp oil
1 medium onion, diced
4 cloves garlic, minced
 8 oz package tempeh, crumbled (Mash it up with a fork or your hands)
1 tsp oregano
1 tsp basil
½ tsp chili flakes (optional)
¾ cup dry red wine (option to substitute water)
1 can diced tomatoes
Instructions
Heat oil in a large skillet over medium-high heat.
Add the onion, and sauté until translucent, about 4 min.
Add the garlic, and cook for additional 2-3 minutes until it has just softened.
Add spices and tempeh crumbles, then sauté with the onions and garlic until the tempeh begins to brown – about five minutes.
Add red wine and stir to deglaze the pan and simmer for another few minutes (or substitute water).
Add diced tomatoes and stir well to combine. If the mixture is too thick, add a bit more water as needed (remember it will thicken as it cooks).
Reduce the heat to medium-low, and let the bolognese simmer for about 20 minutes, stirring occasionally.
Serve over hot whole wheat spaghetti, spaghetti squash, or spiralized zucchini with nutritional yeast or parmesan sprinkled over top if desired
Leftovers keep well for a few days in the fridge, or freeze for later use; great for a packed lunch the next day!
Notes
-Substitute crumbled tofu or cooked lentils for tempeh
-Add more veggies if desired…Really, I encourage it! (Mushrooms, bell pepper, spinach, celery, etc can be sauteed with onion)
-Option to substitute your favourite store-bought or homemade pasta sauce instead of, or in combination with, canned tomatoes. In fact, you can also simply use your go-to spaghetti sauce recipe but swap out the ground beef for tempeh
Week #8: A lighter twist on holiday leftovers!
Week 8 brings us right into that strange time between Christmas and the New Year when no one really knows what day it is (Wednesday, by the way).
While some holiday traditions were put on hold this year, I know that many families and couples still made the effort to have a traditional Christmas dinner with a Turkey and all the fixings to provide some sense of comfort and normalcy. With gatherings being limited this year, the quantity of leftovers might be larger than normal. By this time you’ve probably reached your limit of turkey sandwiches, and the pot pies and stews might be feeling heavy.
This recipe is a lighter option with bright, non-traditional flavours of lemon, turmeric, and ginger…It might be just what you need to kickstart your healthy eating goals as we head into 2021!
 Lemon Turkey Soup
Ingredients
3 Tbsp olive or other vegetable oil
1 large onion, chopped finely
3 garlic cloves, minced
1 tsp ground turmeric
½ tsp ground cumin
½ tsp ground ginger
Salt & Pepper to taste
6 cups turkey or chicken stock (or substitute homemade vegetable stock from week #4!)
Strips of zest from one lemon, plus the juice*
½ to 1 cup barley (more barley will yield a thicker soup)
2 cups chopped cooked turkey
¼ cup chopped parsley
¼ cup chopped cilantro (can sub with more parsley if you don’t love cilantro)
Instructions
*First, use a vegetable peeler to peel strips of zest from a lemon. Use a sharp knife to scrape out and discard any of the white pith that still remains on the inside of the zest strips
Heat oil over medium-high heat in a heavy pot or Dutch oven. Add the onion and cook until translucent; about 3 minutes. Stir in minced garlic and cook another minute, then add turmeric, cumin, ground ginger and a generous pinch of salt.
Pour in the turkey stock and add the strips of lemon zest. Bring to a simmer, then add the barley. Simmer gently until the barley is cooked, about 20-30 minutes.
When the barley is cooked through, add the chopped cooked turkey, lemon juice, parsley and cilantro, and salt and pepper to taste. Cook gently just until the turkey is warmed through, about 3-5 minutes. Remove the lemon zest strips before serving.
Notes
1)For a gluten free option, substitute rice instead of barley
2)Recipe also works well with chicken, or if you don’t eat meat try substituting chickpeas!
Recipe and image borrowed from: https://www.simplyrecipes.com/
Week #7: Follow the 80/20 rule
Being that we are currently well into the holiday season and Christmas is just days away, I thought this would be a good time to remind everyone that part of healthy eating and healthy living includes not beating yourself up for enjoying the occasional treat (Okay, okay it might be more than occasional right now)
You may remember the 80/20 rule from the “Top Nutrition Tips” series.
Eat well and exercise 80% of the time so you can enjoy life’s little pleasures 20% of the time…but what if that 20% could also include beans!?
My favourite thing to do is serve this recipe without telling my guests the secret ingredient. Often they don’t realize it’s there! (But please make sure you know if anyone has dietary restrictions before doing that!)
Easy Flourless Black Bean Brownies
(Makes 12)
Ingredients
- 1 can (15 oz) black beans, rinsed well and drained
- ½ cup quick oats
- ¼ cup vegetable oil (eg canola)
- ⅓ cup maple syrup
- 2 Tbsp cocoa powder
- 2 teaspoon vanilla extract
- ½ teaspoon baking powder
- ¼ teaspoon salt
- 1/2 cup semisweet chocolate chips
Instructions
Preheat oven to 350°. Combine all ingredients except chocolate chips in a food processor and blend until smooth. Stir in chocolate chips then pour into greased or parchment lined 8×8 pan. Bake 20 minutes or until a toothpick inserted in centre comes out clean. Cool at least 10 minutes before trying to cut for best results.
Nutrition: Calories 115 | Fat 5.5g | Carbs 15g | Fibre 3g | Protein 2.5g
Recipe adapted from https://chocolatecoveredkatie.com/
Week #6: Choose lean proteins more often.
Those following a mediterranean style diet know that it is recommended to include fish or seafood a couple times a week.
I often have people tell me that they want to include more fish but don’t know how to cook it well, especially salmon… And I fully understand! Salmon can be intimidating if you haven’t cooked it before. We are worried about the fishy taste and whether or not the family will eat it. This recipe is a good starting point to increase your confidence. Even those who think they don’t like fish might change their mind after trying this flavourful dish. The key is in the marinade!
 Marinated Maple & Soy Salmon
Ingredients
4 salmon fillets approx 4 ounces each (fresh or frozen and thawed)
1/3 cup maple syrup
3 Tbsp soy sauce
1-2 Tbsp sesame oil
4-5 cloves garlic minced or slivered
1 tsp fresh ginger, grated
pepper, to taste
green onions for garnish (optional)
Instructions
In a shallow baking dish, whisk together maple syrup, soy sauce, oil, garlic, ginger and pepper.
Add the salmon and turn to coat. If your fillets have skin, marinate with the skin side up.
Cover the dish and place in the refrigerator for 20-30 minutes, turning once or twice (longer than 30min is not recommended).
Preheat the oven to 400°F (200°C).
*2 options now:
1) Transfer the salmon to a baking dish. Reserve the marinade.
Bake in the preheated oven for about 15 minutes or until the fish turns opaque.
While the salmon is baking, place the marinade in a small sauce pan. Bring to a rapid boil and whisk for 1 minute.Reduce heat to medium-high and simmer for about 2 minutes until slightly thickened. Don’t forget to whisk!
Plate the salmon and drizzle thickened glaze over the top.
OR
2) (This option is what I do when there are too many things on the go) Bake in the marinating dish with the extra marinade. Sauce will not thicken as much but can still be drizzled over fish and/or rice.
Garnish with sliced green onions if desired.
Note: If you are trying to decrease your carbohydrate or sodium intake, you can also discard the marinade. The fish will still have lots of great flavour on its own, but with a little bit less sugar/salt!
Nutrition (Approx)
Serving: 1 fillet with ¼ of marinade | Calories: 390kcal | Carbohydrates: 19g | Protein: 28g | Fat: 22g | Saturated Fat: 3g | Cholesterol: 70mg | Sodium: 750mg
Week 5 – Get the Kids in the Kitchen!
While I do not encourage “hiding” vegetables from your kids (or spouse), I am all about fun ways to incorporate more vegetables. This recipe is kid approved with fun colours and a neutral flavour.
 Pink Power Pancakes!
Fun for kids and adults alike!
Ingredients
2 cups dry rolled/quick oats
1 ½ tsp baking powder
¼ tsp salt
2 large eggs
½ cup plain Greek yogurt
2 tsp vanilla extract
4 oz beets cooked and peeled (About 1 cup)
½ cup mashed ripe banana or unsweetened applesauce
3 tbsp maple syrup
2 tbsp flavorless oil plus more for cooking (I use avocado oil)
Instructions
Combine oats, baking powder, and salt to a high-speed blender or food processor. Blend until oats become a fine powder.
Pour mixture into a bowl and set aside.
In the (now empty) blender/processor, combine remaining ingredients (beets, egg, oil, yogurt, vanilla, syrup, banana/applesauce). Blend until smooth and well combined. Add the oat flour mixture into the processor and blend again. Stop a few times to scrape the sides and ensure everything is well mixed.
Heat a frying pan/skillet over medium heat. Add a little cooking oil to the pan. When the oil is hot, portion out the batter into small pancakes.
Cook until you see small bubbles forming on the top of the pancake and the edges seem dry, about 2-3 minutes. Flip and cook the other side for another 2-3 minutes. Place cooked pancakes onto a plate and continue with the remaining batter.
Enjoy warm with topping of choice. Let cool completely before storing leftovers in an air-tight container in fridge for 4-5 days or in freezer
Notes
1) Studies show that getting children involved in cooking and food preparation early on helps decrease picky eating tendencies and lead to better nutrition habits later in life, so I encourage you to get the kids involved! Have them help peel the beets. Let them press the button on the blender, and see their expression when all the ingredients get added together to make that delightful colour! Kids are more inclined to eat and try new foods when they are involved in the preparation.
Spinach pancakes are also great for this. You can find some recipes online, or shoot me a message for more info!
2) Roasting the beet(s) will yield the best flavour/colour. Wrap in foil and roast at 400° for about 1 hour or until soft. Let cool before peeling (Skin should rub right off)
3) Don’t be alarmed if this batter appears thicker than your standard pancake batter! The pancakes will also be a bit more moist and dense than a standard pancake (Which I personally prefer, but you can always add some milk or milk alternative if you prefer a lighter texture)
Recipe adapted from https://thenaturalnurturer.com/
Week 4 – Reduce your salt intake
It is week 4 of the recipe series and soup weather is upon us! Soups and stews are a great way to warm up on a cool day, and with crockpots and instant pots they can be a convenient meal prep option for busy families. While it is easy to pack lots of good nutrition into a pot of soup one of the downfalls can sometimes be the broth we choose. Storebought broth and bouillon cubes can be quite high in sodium, so why not try making your own?
This “recipe” is a great way to squeeze every bit of nutrition out of the foods you grow or purchase while cutting down on food waste, saving money, and reducing your sodium intake!
This is actually less of a rigid recipe and more of a loose formula which you can modify and customize depending on what ingredients you have.
The key to this recipe is the “scrap bag” (or container) that you are going to be keeping in your freezer and adding to every time you are prepping vegetables.
Homemade Soup Stock!
Ingredients
1. Frozen vegetable scraps (and/or fresh if you have them) – Suggestions: carrot ends/peels, celery ends/leaves, discarded portion of leeks, cilantro/parsley stems, pumpkin guts, squash peels, bell pepper innards, tomato ends, spinach, etc…
2. Water
3. Spices (1-2 bay leaves, italian seasoning, chili flakes, peppercorns, extra garlic)

Instructions:
Dump vegetable scraps in a large pot. Add extra spices as desired, and anything in the fridge that is wilting. Add water to a few inches above scrap pile. Bring to a boil and then reduce heat and simmer for ~30 minutes.
Let cool and pour into jars. Refrigerate if making a soup this week, or freeze for longer storage.
Notes:
*While I included cilantro, too much can be over powering, so use sparingly.
*Cruciferous vegetables (broccoli, turnip, cabbage) may give broth an unpleasant pungent taste, so not recommended to include unless you REALLY like that cabbage soup taste (remember you want a broth that will complement whatever soup recipe you are making next)
*Do not include any vegetables which have SPOILED. Wilted veggies are okay but if you have tomatoes with mold spots or slimy peppers those need to be tossed!
*To make chicken/turkey broth, the same process would be done with the carcass. I usually add a few cloves of crushed garlic, poultry seasoning, and some onion/leek from my scrap bag for extra flavour.
Feel free to experiment with different flavours and combinations…if it tastes terrible, write it off as an experiment. At least you were only using scraps anyway!
Week 3 – Eat and Cook at home more often
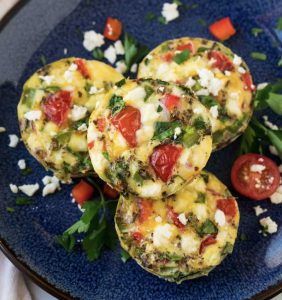
Breakfast is a problem area for many busy people, which is why coffee shops and fast food restaurants do so well in the morning! While choosing Starbucks or Tim Hortons egg bites are not the worst fast food breakfast, you can save time and money by preparing them at home instead…Plus you get to choose the ingredients! This recipe is very customizable and can suit all dietary needs and preferences. Prep in advance and enjoy all week long!
Freezer Friendly Egg Cups (Think Starbucks egg bites!!)
(Makes 12 egg cups)
Ingredients
12 large eggs
1 cup chopped spinach
1 cup chopped mushroom
½ cup finely diced onion
1 medium red bell pepper, finely diced
1 medium green bell pepper, finely diced
¼ cup crumbled feta or shredded cheddar (optional)
¼ tsp dried basil
Salt & Pepper to taste
Instructions
Preheat oven to 350°.
Spray a standard 12-cup muffin tin with non-stick spray (or use silicone muffin liners set on a baking sheet).
Divide vegetables between the 12 cups (Should be about ⅔ full).
Whisk together eggs and spices and divide mixture between cups (Should now be about ¾ full).
Sprinkle cheese on top, if desired.
Bake for 24-28 minutes, or until egg has set.
Run a butter knife around the edges to loosen. Enjoy immediately or let cool on a wire rack before freezing
Notes
- Store leftovers in an airtight container in the refrigerator for up to 3 days or individually wrap and freeze for up to 3 months. Reheat gently in the microwave (once thawed or directly from frozen) until hot and warmed through to the center, about 30 seconds (from thawed) or 1 minute (from frozen), depending upon your microwave. If you plan ahead and thaw your egg cups, you can also pop them in the toaster oven for 2 minutes for a crisper texture.
- This recipe is very flexible! Try with different veggie and spice combos, or use up any veggies that are starting to wilt in the fridge. If you are trying to increase your protein intake, feel free to add diced cooked chicken or tempeh. Here are some other good flavour combinations to try:
-
-
- Broccoli, onion, mushroom, & cheddar
- Roasted red pepper, artichoke, onion, & goat cheese
-
Nutrition (1 egg cup): Cal 70 | Carbs 3g | Fiber 1g | Protein 8g | Fat 3g | Sodium 148g
Recipe adapted from https://www.wellplated.com/
Week 2 – Choose whole grain options more often
As a dietitian I often encourage people to choose whole grain options more often. Choosing whole grain breads and crackers over their white relatives is a great start, but I challenge you to go one step further! This recipe is a twist on classic stuffed peppers, replacing white rice with quinoa and beef with beans for a fiber filled, heart healthy alternative. Did you know that quinoa contains more fiber, protein and micronutrients than rice? It also has a lower glycemic index, meaning that a serving of quinoa will cause a less dramatic blood sugar spike than an equal serving of white rice.
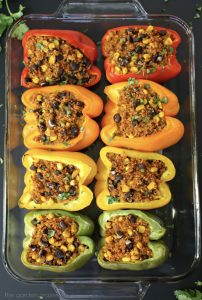
Quinoa Stuffed Peppers (serves 4)![]()
(Image borrowed from thegardengrazer.com)
Ingredients
4 bell peppers (any colour)
1 medium-large onion, diced
2 cloves garlic, minced
1 cup uncooked quinoa
1 cup corn
1 can black beans, drained and rinsed
1 can diced tomatoes (option to substitute tomato sauce)
2 tbsp cooking oil
1 tsp chili powder (optional)
Salt and pepper to taste
Shredded cheese (optional)
Chopped fresh cilantro (optional)
Instructions
Preheat oven to 400 degrees.
Begin to cook quinoa according to package directions (or add 1 cup quinoa & 2 cups water to saucepan, Bring to a boil then reduce to a simmer and let cook for 15-20 min or until water is all absorbed. Let stand 5 min with the lid on before serving/using)
While quinoa is cooking, cut peppers in half and remove seeds. Place in baking dish, cut side up and add just enough water to cover the bottom of the dish. Bake for about 20 minutes or until soft (this will allow peppers enough time to fully cook as the filling does not need excessive baking time).
For the filling, heat oil in a large frying pan over medium heat. Add onions and garlic; sautee until translucent. Next, add tomatoes, corn, beans, and quinoa. Combine all ingredients and simmer until most of the liquid has evaporated.
When peppers are ready, carefully spoon topping into cut peppers (It’s okay for the topping to mound above the opening). Sprinkle with cheese if desired and return to oven for another 10 min. Garnish with cilantro for serving if desired.
Variations
-Swap out black beans for lentils or tempeh
-Add any spice combination desired (oregano/basil for an italian flavour, cumin for a mexican twist, etc)
-Sprinkle with shredded cheese or nutritional yeast if desired.
These keep well in the fridge and can be re-heated for lunch or dinner the next day!
Approximate nutrition for 2 halves: Calories: 344kcal | Carbohydrates: 62g | Protein: 19g |Fiber: 17g
Week 1 – Eat more Veggies!
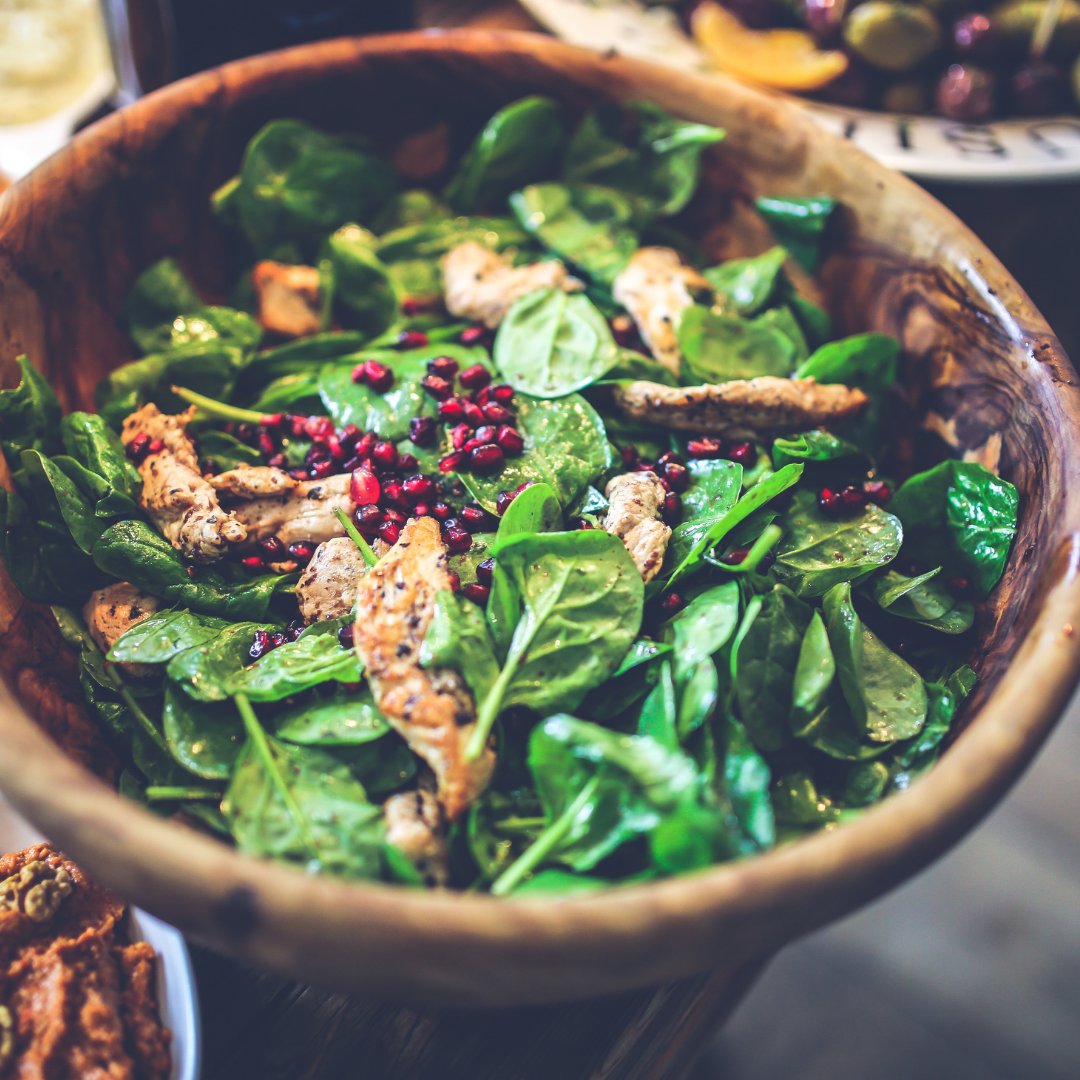
The purpose of sharing this recipe is to prove that salads don’t have to be boring. Including a salad as a meal or side is a great way to increase vegetables. Depending on the ingredients, they can be full of fibre, antioxidants, and essential nutrients while being low in total calories, saturated fats, or carbohydrates. Of course salads are not the only option but for those salad eaters looking for a new idea, this is a hearty option full of seasonal vegetables and packed with flavour. The best part is, it stands up well enough that it can keep a couple days in the fridge (Did somebody say meal prep?) Add a protein of your choosing and you have yourself a balanced meal!
Looking for more salad inspiration or other strategies to boost your veggie intake? Feel free to reach out or book a 15-minute meet and greet!
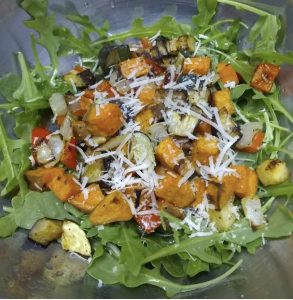
Roasted Vegetable and Arugula Salad
(About 2 meal-sized servings or 4-6 side salads depending on serving size/appetite)
Ingredients
4-6 cups fresh arugula
1 medium sweet potato, cubed
1 small eggplant, cubed
1 sweet bell pepper, chopped
½ medium onion, chopped
1 small zucchini, cubed
Juice of 1 lemon
Ground black pepper, Italian seasoning, chili flakes, to taste
2 Tbsp freshly grated parmesan (optional)
Proteins of choice (see notes below)
Instructions
Preheat oven to 375.
Coarsely chop/cube vegetables and toss in a large bowl with olive oil and spices.
Spread evenly on parchment lined baking sheet. Roast vegetables for about 40 minutes, mixing halfway.
Add roasted vegetables to arugula. Squeeze juice of 1 lemon over top and sprinkle with parmesan if desired.
Notes
This recipe works great with any roasted vegetables. Use whatever you have in the fridge or any seasonal veggies! Other tasty options include: roasted garlic, asparagus, beets, parsnips…the options are endless!
For a lower carb version, swap the sweet potato for any other veg. For low FODMAP, eliminate the onion.
To make this salad a meal, add a protein serving…
- Grilled chicken breast
- ½-¾ cup chickpeas or lentils
- 1 cup crispy baked tofu
- ½ cup mixed nuts/seeds (roasted pumpkin & sunflower seeds are my favourite!)
No parm? No problem! Substitute feta or goat cheese for a twist, or leave it out entirely.
Because arugula is a bit of a heartier green, this salad keeps well for 1-2 days in the fridge. Great for meal prep!